
RGB Planetary Aligning
Right, ladies and gents, this is a very, very basic tutorial on how I use EZCap, the supplied software that comes with QHY’s 8L camera. A few of you are starting to use this camera, and the supplied software might be the first exposure that you have to the wonderful world f cooled CCD cameras (it was for me!). EZCap comes with no instructions or help file, and although it is pretty straightforward once you get your head around it, it can be a bit intimidating.

Once you have stacked and sharpened the RGB data captured during mono planetary imaging, you then have to assemble the data sets in an image processing program to build a colour image.
In this example, I am going to show how to use Photoshop to do this.
Following the stacking and sharpening, you should now have, at least, three images, each one representing Red, Green and Blue data. You may also have captured Luminence data or near-IR data using a filter such as the Pro-Planet IR742. For this example, I will only use RGB data.
Open the folder where the three images are stored and drag and drop them into Photoshop. You should end up with three seperate image windows.

Once your images are open, the first step is to convert them to Grayscale images. Usually Photoshop will load the images as RGB even though there is no actual colour data in the image. To do this, on the menu bar, click Image>Mode>Grayscale. Photoshop will ask if you want to discard the colour data (remember, there is no colour data in the image!). Select OK. Repeat this for each image and you will end up with three greyscale images, ready for combining.
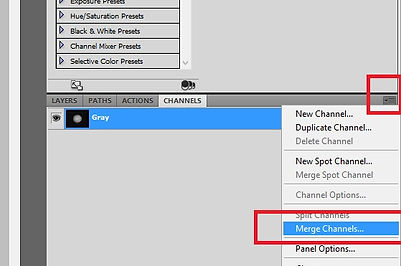
Now you are going to combine the three images into a RGB colour image. To do this you will use the Channels tab. If you cannot see the Channel tab (its usually beside the Layers tab) then go to the menu bar and select Window>Channels.
Once you have the channels tab open (it doesn't matter which image you have selected) click on the drop-down menu on the right-hand side (it looks like a stack of horizontal lines). Select "Merge Channels". Photoshop will pop up a small window. Beside Mode change the drop-down to RGB Colour. The Channels should have defaulted to 3

The window will now change to a selector box where you can insert each of your greyscale images into the correct colour channel. Change each drop-down to make sure that the Red image goes to the Red channel amd so on. In the example to the left the Blue image has ended up in the Green channel. By selecting the green image I can get the right data into the Green channel.
Once you have selected the correct data hit OK. Photoshop will now combine the channels and show you your image in glorious Technicolour!

Unless you are extremley lucky the colours won't be exactly aligned. So, from here we will go to Aligning Colour Channels and Luminence Layers