RGB Planetary Aligning Colours
Right, ladies and gents, this is a very, very basic tutorial on how I use EZCap, the supplied software that comes with QHY’s 8L camera. A few of you are starting to use this camera, and the supplied software might be the first exposure that you have to the wonderful world f cooled CCD cameras (it was for me!). EZCap comes with no instructions or help file, and although it is pretty straightforward once you get your head around it, it can be a bit intimidating.

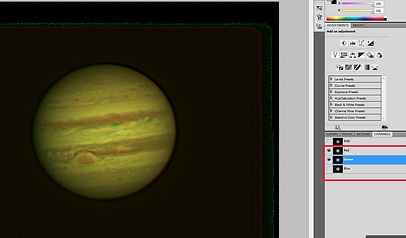
If you look cloesely at the planet's limb you can see a green tint on the right and a reddish tint on the left. This indicates that the colour channels aren't sitting directly on top of each other.
Also notice the moon (in this case Io). The seperation of the colour channels is very evident here. This is partly caused by the channels not being aligned but mainly due to Io's very fast orbital speed. So fast that it has moved between each imaging run. In cases like this I will align the colour channels for the planet and save the image. I then align the colours for the moon and save that as a seperate image. Layers would then be used in Photoshop to blend the two images into one.

To align the colour data, open the channel tab again. You will see four areas named RGB, Red, Green and Blue. These allow you to select the combined image (RGB) or an individual colour such as Red, Green or Blue. You can turn channels on or off by selecting or de-selecting the eyeball symbol to the left. This is very similiar to working with Layers.
To align the channels I normally use the Red channel as a "reference". This is because the Red channel is normally the sharpest of the three channels.
As we know that the Green channel is mis-aligned, click your mouse on Green. The other channels will be switched off. Now click on the Red channell eyeball to turn the Red channel on. Notice that although the Red channel is visible, the Green channel is selected. Any changes that you make will only be to the Green channel.

To align the Green channel to the Red channel hit "V" to select the Move tool. Use the arrow keys on the keyboard to "nudge" the Green channel up, down, left or right until it lines up with the Red channel. As you move it you will see the green tint increase or decrease on the limb. It's tempting to align using the planet's limb but you will usually get better results by aliging to specific features on the planet. The Great Red Spot of clouds work well for this.
You can check the alignment by clicking the Green eyeball icon on and off. This will allow you to see how well the data is lining up.
Once you are happy with the green channel, repeat the process for Blue. The Blue data usually is quite blurred as Blue light is badly affected by atmospheric turbulence.
Once you are happy, make sure to click on RGB to re-select all channes. Congratulations- you have now assembled a colour image from mono data!

Now that you know how to manipulate individual colour channels you can use the colour data as Luminance data.
Onwards to Part 3